
If you need to handle many websites on a regular basis, you’ve come to the correct place! RunCloud is an excellent automatic server management application for tying together all of your cloud servers. It speeds up and simplifies the installation of websites and databases, improves security, and automates updates.
We’ll teach you how to connect your GBCloud server to RunCloud and set up your first web app in this tutorial. To get started with RunCloud, simply follow the steps below.
1. Sign up with GBCloud
First and foremost, if you haven’t already, join up for GBCloud. To create an account, click here.
2. Deploy a new Virtual Private Server(VPS)
It’s simple and quick to set up a new VPS with GBCloud. To get started, go to the cloud area of your GBCloud control panel and click create an instance.
A lot of choices for customizing a new cloud VPS are available on the deployment page.
- Give your VPS a hostname and description
- Choose a configuration that fulfils your needs.
- Select any of the Ubuntu Linux operating systems that are available.
- If you like, you can add SSH keys.
- Create instance!
3. Sign up with RunCloud
The next step is to sign up for a RunCloud account.
Enter your name, email address, and password to start up a new account. After that, you must validate your email address before you can log in.

4. Connect a server to RunCloud
RunCloud offers a simple control interface with one-click solutions to typical activities. Deploy directly from Git or a script-installed CMS such as WordPress. When you use RunCloud to launch your cloud server, you get an optimized server stack that includes the greatest alternatives available, such as Nginx, Apache, Redis, MariaDB, and Memcache.
Log into your RunCloud account after you’ve registered and validated your email address. A clean dashboard will greet you, along with a click to connect a new server. To get started, click the Let’s get started button.

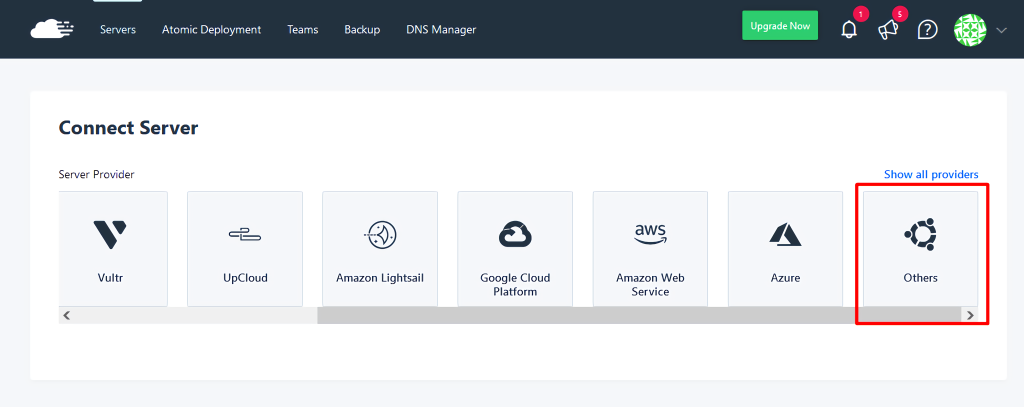
Select Others from the Connect Server section.
Check that the firewall on your cloud server needs to allow the following:
- 80/tcp
- 443/tcp
- 34210/tcp
- 22/tcp
A clean install of Ubuntu 20.04 on GBCloud does not restrict these ports so you are good to go.

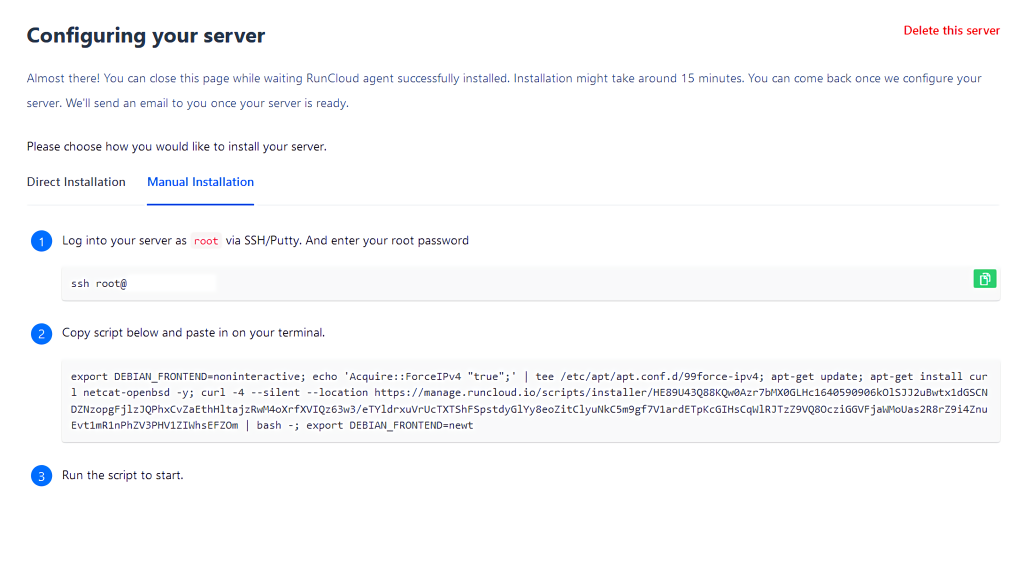
Give your server a name, input the server’s public IP address, and then click the Add this server button in the server connection settings.

You will then be given a bootstrapping script to run on your cloud server. Log in to your cloud server through SSH using the root account and the password emailed to you, as well as any SSH keys you included during deployment.
Then, on your server terminal, paste the script and run it.
RunCloud will install the essential dependencies as well as software and tools such as Fail2ban, MariaDB, and NGINX on the server.
When the installation is complete, you should see something similar to the example below. This includes the database root password as well as the newly established RunCloud user account and password. You should keep these in a safe place.

Following that, you will be taken to the server summary page, which will provide an overview of the server’s resource utilization, uptime, and installed programs.

RunCloud now has access to your first server, which you may administer. Continue with the guide to test the server by installing a basic WordPress installation.
5. Setting up a database
Once your server is linked, you may begin installing apps. For this example, we’ll create a simple WordPress site that requires database access. RunCloud comes with a secure MariaDB installation that can be simply controlled through its management panel.
In your server management, go to the Database view and click the Create Database button.

Name the DB and click the Add Database button in the new database settings.

Then, to set up WordPress credentials, click the Create Database User option.

Create a password for the user account and give it a name. You can save time and effort by using the password generator. Make a note of the password and store or copy it somewhere you’ll remember it later.
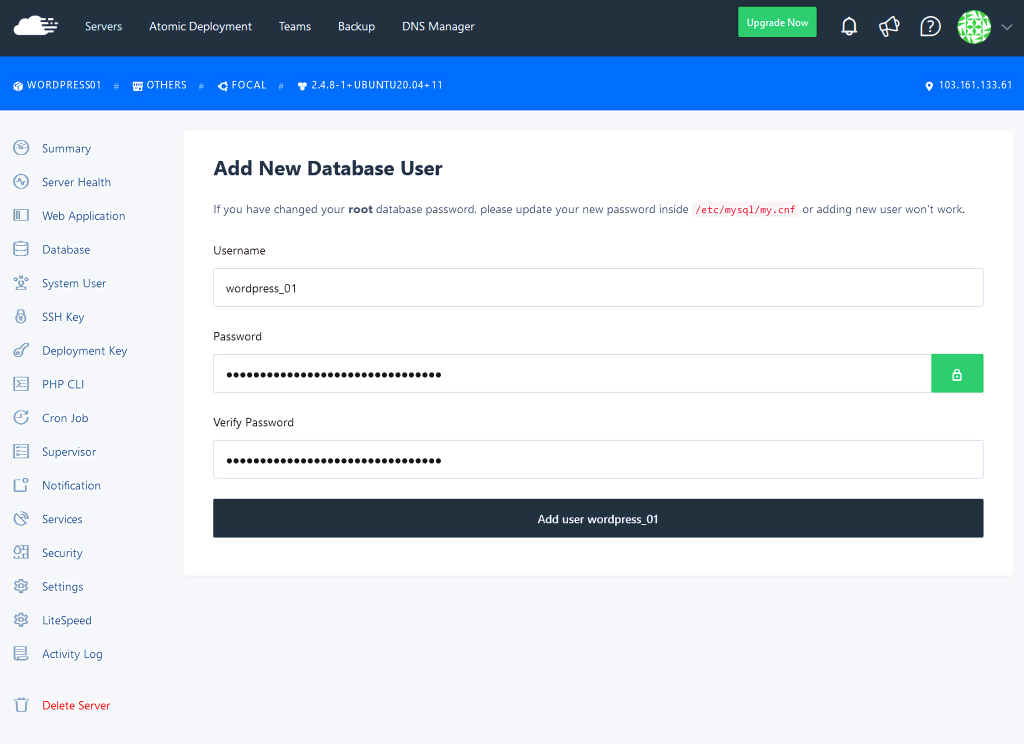
Then, by selecting the Grant User option, you may add the new username to the WordPress database. Finally, click the Grant User option to add the newly formed username to the WordPress database.

You now have a database for your first web application that is ready to use. Continue with the WordPress installation by following the steps below.
6. Creating a web application
RunCloud enables you to construct a variety of web applications, like Drupal, phpBB, and, of course, WordPress, fast and easily. To get started, go to the Web Application area and select the Create Application button.

Give the web application a name, a domain, and a PHP version. Then select Add Web Application from the drop-down menu.

Fill in the WordPress site title, admin username, admin password, and admin email address by scrolling down a little.

Continue to scroll down a little more. You can put in all of the database information below if you want. If that’s not the case, go ahead and click the Add Web Application button.

Once the app has been created, open the More menu and select the Set as the default Web Application option to make it the server’s principal service.

Then, using the ready-made script, install WordPress. Select the WordPress script from the Script Installer section. Then, by selecting the Install button, you can start building your site.

That’s all, the installation is complete! You’ll still need to set up the WordPress site, but you can move forward with the setting procedure.
Conclusions
More than just a website administration tool, RunCloud has a lot to offer. They offer sandboxed web apps, Nginx or Hybrid web application stacks, website monitoring and notifications, automated web application deployment using your Git repository, Atomic Git deployment, and more. On RunCloud, you’ll discover all of the tools you’ll need for professional site design and development.